Hey there! Some links on this page are affiliate links which means that, if you choose to make a purchase, I may earn a small commission at no extra cost to you.!
Sharing Is Caring!
Moisture, a silent intruder hidden beneath our homes, can cause a multitude of problems that often go unnoticed until they become glaringly evident.
Sagging and bouncy floors are some of the common signs of a moisture issue, and it was precisely these symptoms that prompted me to take action in my own home. So, I decided to install a sump pump in my crawl space.
To install a sump pump in a crawl space, dig a pit, place the pump inside, attach PVC pipes for drainage, secure the discharge pipe, and plug it in. Ensure proper slope for water flow and regular maintenance.
It is a detailed process that requires careful planning and execution to ensure your home remains dry and free from the damaging effects of excess moisture.
I will share my own experience and insights into installing a sump pump in my crawl space. But first, let’s get to know what a sump pump is and how it works.
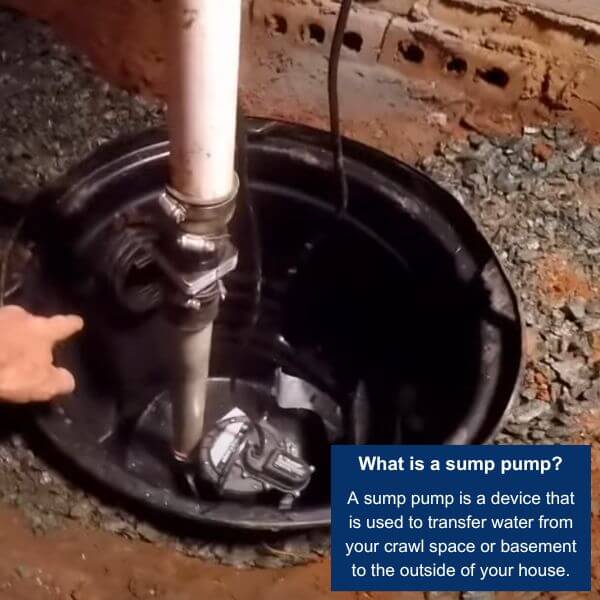
A sump pump is a device that is used to transfer water from your crawl space or basement to the outside of your house.
According to a study conducted by the Insurance Information Institute (III), every year, about 1 in 60 insured homes files property damage claims due to water damage or freezing (1).
This emphasizes the importance of managing these risks for homeowners and insurers.
This is where a sump pump comes in. By efficiently removing excess water, a sump pump helps protect your home from potential water damage and the associated problems like mold, structural damage, and deterioration of valuables stored in these areas, prone to moisture buildup and flooding.
How Does A Sump Pump Work?
Sump Pit
The heart of a sump pump system is a sump pit, which is essentially a hole dug into the lowest part of your basement or crawl space.
This pit collects water that may enter through various sources, such as groundwater, rainwater, or leaks from plumbing fixtures.
Water Collection
As water enters the sump pit, it naturally accumulates there. Some sump pits also have a perforated lining or a drain system that allows water to flow into the pit more efficiently.
Sump Pump Activation
When the water level in the sump pit reaches a certain predetermined height, a float switch or pressure sensor activates the sump pump.
This trigger mechanism is similar to how a toilet tank’s float valve works.
Pumping Action
Once activated, the sump pump starts pumping the accumulated water out of the pit. It typically uses an electric motor to power a pump mechanism.
The pump is equipped with an impeller that creates a centrifugal force, pushing the water through a discharge pipe.
Discharge Line
The water is pumped out of the sump pit through a discharge pipe, usually directed away from the house.
Some setups might have a check valve on the discharge pipe to prevent the water from flowing back into the pit.
Shutoff
When the water level in the sump pit falls to a certain low point, the float switch or pressure sensor deactivates the sump pump, stopping the pumping action until the water level rises again.
Sump pumps come in two main types: pedestal and submersible. Pedestal pumps have the motor mounted above the sump pit, making them easier to service but more visible.
Submersible pumps, on the other hand, are entirely submerged in the pit and are generally quieter and less obtrusive.
As per the natural disaster facts, in the United States, about 90% of natural disasters involve flooding (2).
In regions prone to heavy rainfall, high water tables, or a history of basement flooding, sump pumps are often considered an essential part of home maintenance and protection.
Regular maintenance, including cleaning the sump pit and testing the pump, is important to ensure its reliable operation during times of high water intrusion.
How To Install Sump Pump In Crawl Space? A Step-by-Step Guide
As a DIY lover, I have personally installed a sump pump in my home’s crawl space area that helped me fix moisture problems in crawl space that causes bouncy and saggy floors.
It was a great successful experience that I want to share with you as a step-by-step DIY crawl space sump pump installation guide. So, let’s begin!
Step 1: Gather Supplies
When I decided to tackle the sump pump installation in my crawl space, I gathered all the tools and materials I needed. Here’s what I recommend:
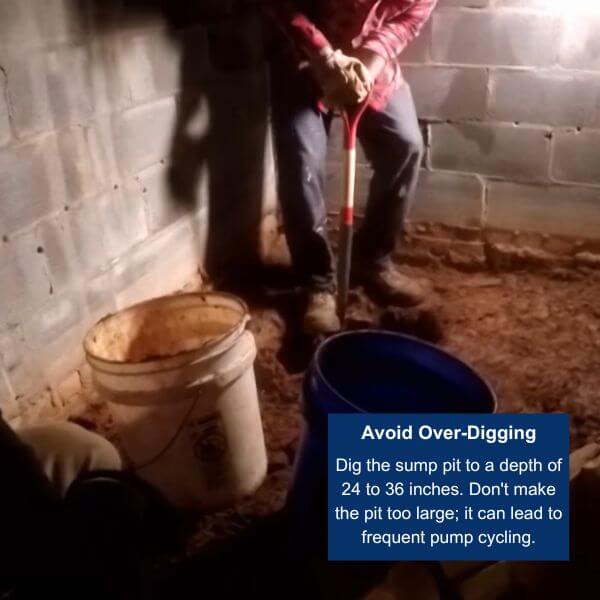
I started by enlisting the help of a couple of friends. We began digging the sump pit of around 32 inches in my crawl space using a small Fiskars shovel.
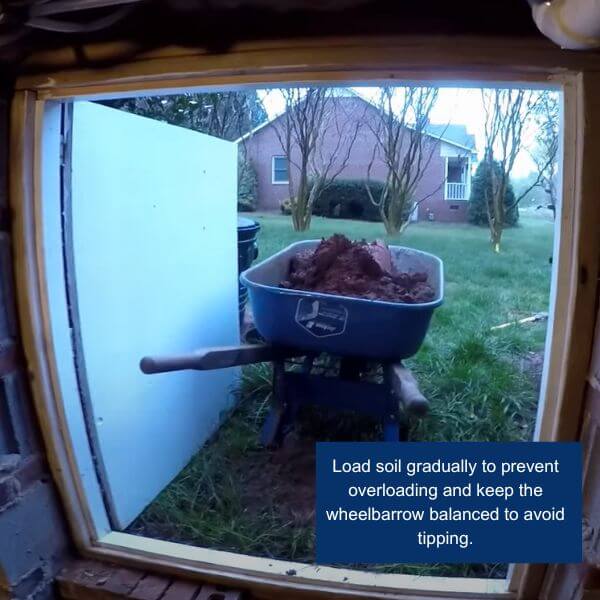
It was essential to create enough room to work comfortably. We used 5 gallon buckets to haul the dirt outside and then transferred it to a Marathon wheelbarrow.
This dirt would later be used to grade the area away from my house.
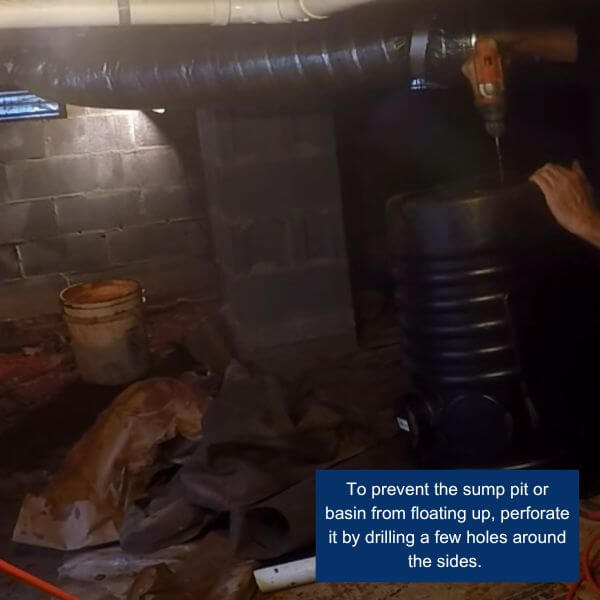
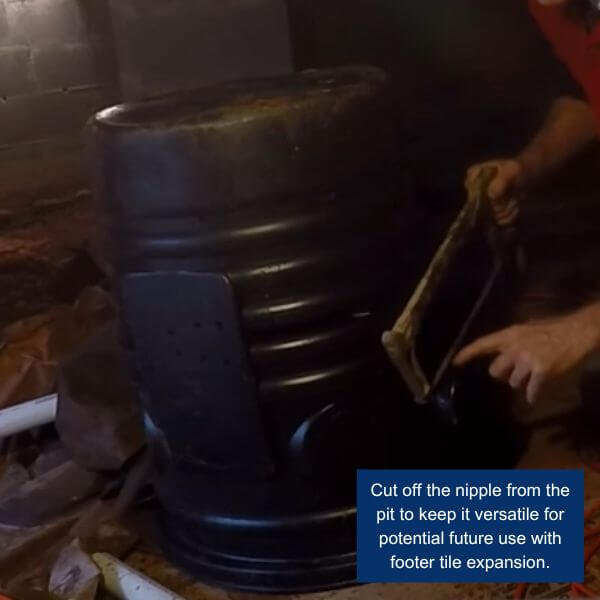
Step 3: Perforate the Sump Pit
To prevent the sump pit or basin from floating up, we carefully perforated it by drilling a few holes around the sides.
Additionally, we cut off the nipple from the pit to keep it versatile for potential future use with footer tile expansion.
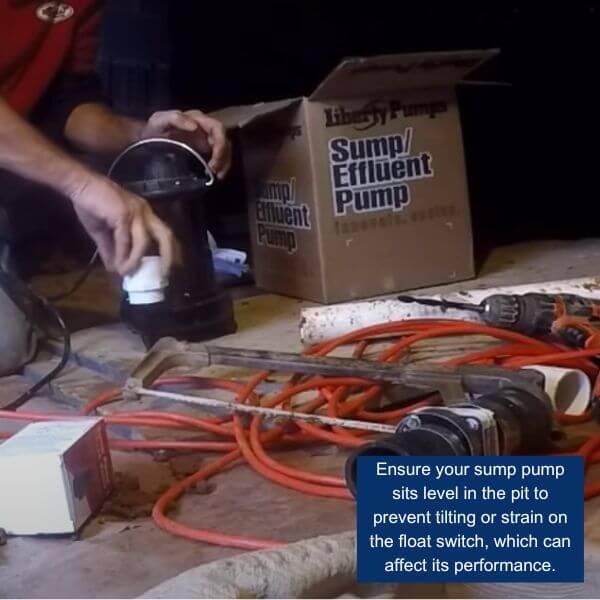
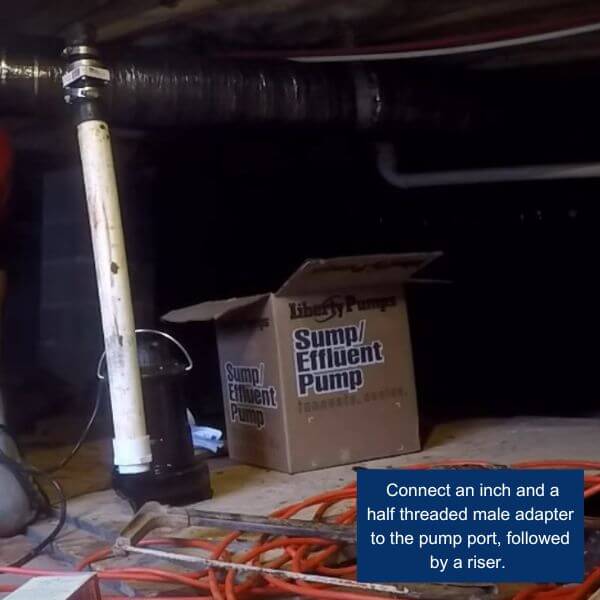
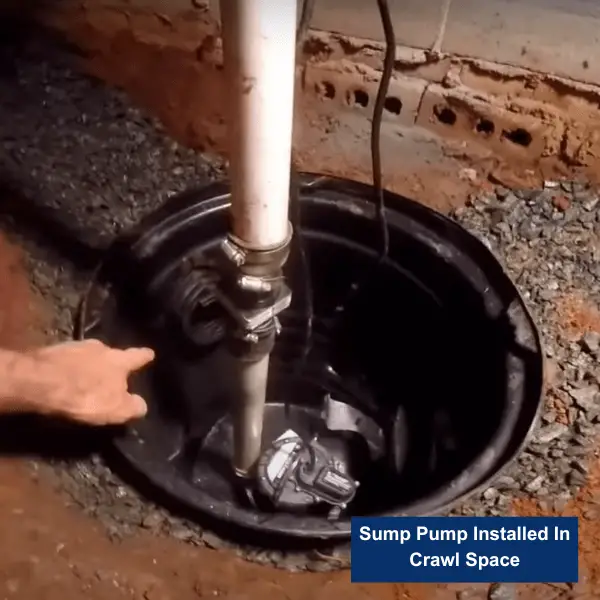
Step 4: Install A Sump Pump
Placing the sump pump (Liberty Pumps 257) into the pit, we ensured it sat securely at the bottom.
Next, we connected an inch and a half threaded male adapter to the pump port, followed by a riser. These connections were firmly secured using J-B Weld PVC glue.
Pro Tip: Ensure your sump pump sits level in the pit to prevent tilting or strain on the float switch, which can affect its performance.
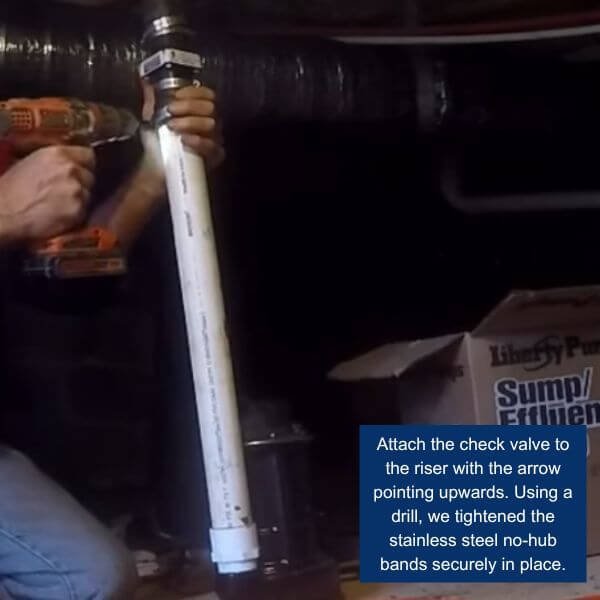
Step 5: Install the Check Valve
We attached the check valve to the riser with the arrow pointing upwards. Using a drill, we tightened the stainless steel no-hub bands securely in place.
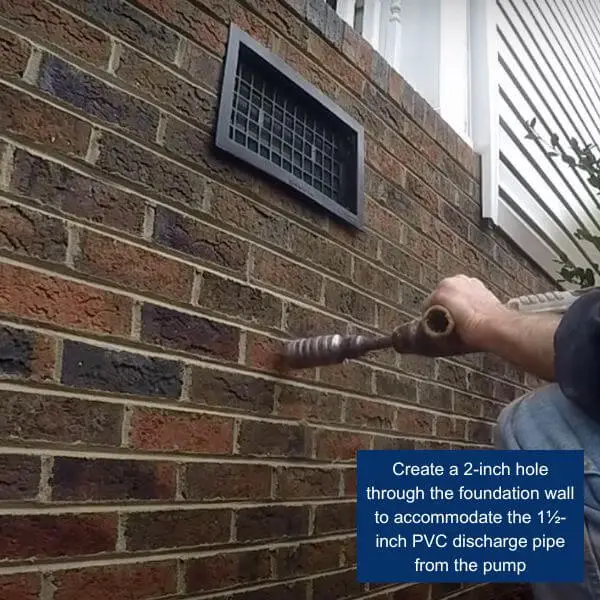
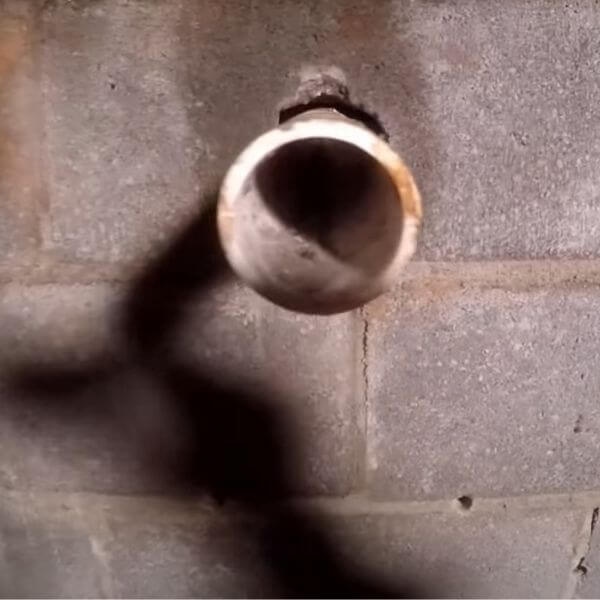
In my case, I needed to core from both sides to ensure the hole was 12 inches deep.
Step 7: Plumb the Sump Pump
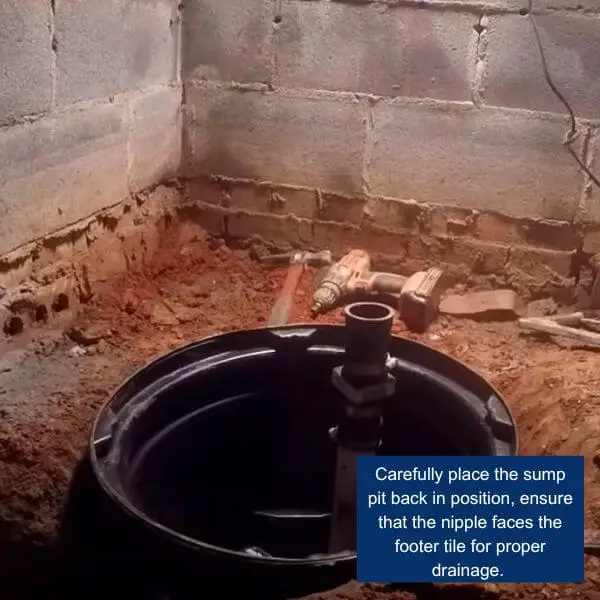
Carefully placing the sump pit back in position, we ensured that the nipple faced the footer tile for proper drainage.
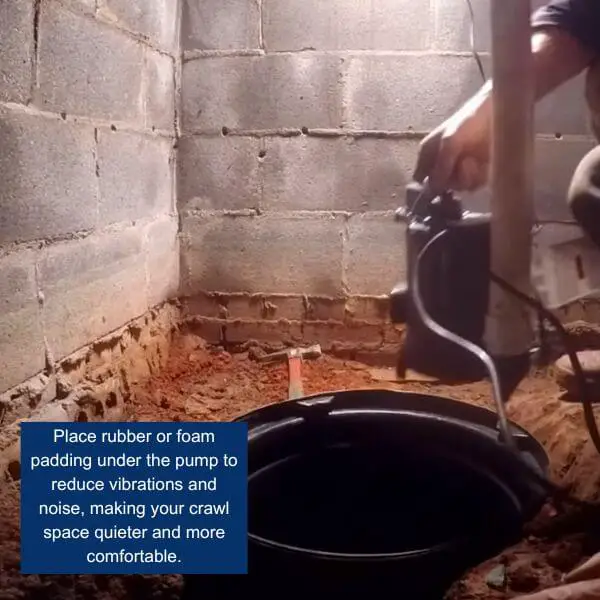
We then lowered the sump pump into the pit, making sure its cord was positioned correctly.
Pro Tip: Place rubber or foam padding under the pump to reduce vibrations and noise, making your crawl space quieter and more comfortable.
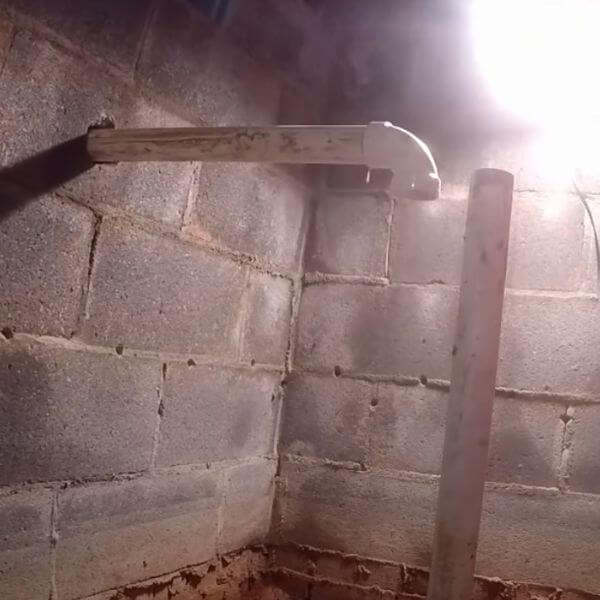
Step 8: Connect the Check Valve and 90-Degree Elbow
Starting with the check valve, we ensured it fit snugly onto the rubber piece before tightening the clamp with a 5/16 inch drill bit.
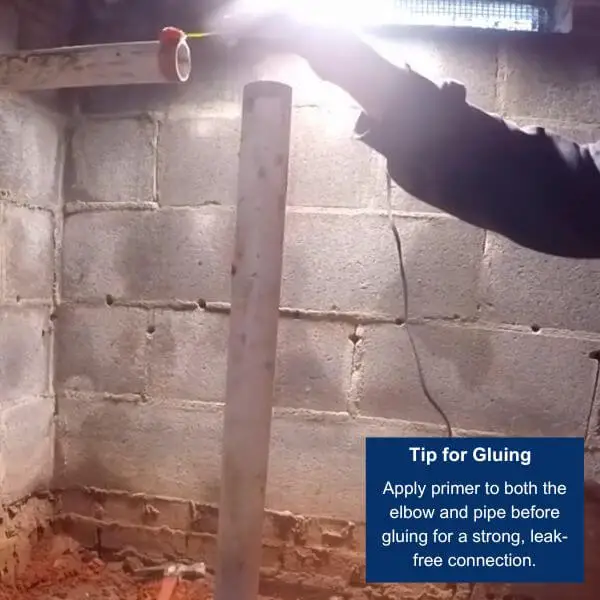
Step 9: Glue the 90-Degree Elbow to the Discharge
To prepare for gluing, we primed both the 90-degree elbow and the discharge pipe.
First, we attached the discharge pipe to the wall, as it allowed some movement. Then, we glued the 90-degree elbow to the discharge pipe.
Step 10: Secure All Connections
We checked that all connections were securely glued and fastened.
While connecting the pump, we applied downward pressure to prevent the check valve from coming apart. Double-check for any leaks.
Step 11: Redirect the Discharge Away from the Foundation
We applied Oatey PVC cement primer to the foundation wall and attached an extension to the discharge pipe to redirect water about 20 feet away from my home’s foundation.
Step 12: Cover and Final Touches
Finally, we covered the installation area with pine straw and poured gravel over the pipe in the trench. Gravel’s voids allow water to permeate through, directing it into the perforated pipe and ultimately to the sump pit, where the sump pump will lift and discharge it safely.
That’s it! I successfully completed the sump pump installation in my crawl space, ensuring my home is protected from excess water and potential flooding.
The project took a few hours and provided peace of mind knowing my property is safeguarded.
Personal Recommendations
Based on my personal experience, I want to suggest some helpful recommendations for the sump pump installation in crawl space.
Testing and Verifying Sump Pump Functionality
When it comes to sump pumps, I’ve learned from personal experience that regular checks are essential. To kick things off, always make sure your pump stands upright.
Once, I overlooked this, and it caused some issues. Then, pour some water into the sump basin to see if it’s working correctly.
It’s almost like a reassuring ritual for me now. But if it’s not doing its job, don’t worry; I’ve been there too.
Check the impeller, that little spinning part, which can get clogged with debris.
Look at the float switch for proper movement, examine the check valve for any blockages, and take a peek at the intake. These simple steps have saved me from potential disasters.
Sump Pump Maintenance: Keeping It Clean for Reliability
Maintenance is the key to a sump pump’s heart, in my opinion. Sometimes, all it needs is a good cleaning.
Clearing the discharge at the vent’s end is a routine for me now. Sediment and silt tend to build up there, causing unnecessary stress on the pump.
And don’t forget about the pump’s grate. If it’s clogged, water won’t escape properly. A clean pump is a happy pump, and it’ll be there when you need it most.
Monitoring Discharge Distance: Protecting Your Investment
I can’t stress this enough: where the water goes matters. It’s not just about getting it out of your basement or crawl space; it’s about keeping it away.
I’ve seen water filter back through the ground because it didn’t get at least 20 feet away.
That’s double trouble for your sump pump, and I’ve learned the hard way that it’s best to avoid overworking it.
Annual Sump Pump Check-Up: Your Pump’s Best Friend
Think of the annual check-up as your pump’s yearly physical. I did it myself and you can do it yourself too.
Trust me; it’s worth it. I inspected every nook and cranny, cleaned what needed cleaning, and made any necessary repairs.
It’s like an insurance policy against costly fixes down the road. After all, nobody wants a surprise flood.
Additional Sump Pump Considerations: Lessons from Experience
Now, here are some advices of wisdom I’ve gained through my own sump pump adventures:
Crawl Space Management
To prevent water woes, I’ve closed off my crawl space using a plastic vapor barrier. It’s like a protective shield against moisture and outside air, keeping things dry down there.
Alarm Systems
Once, I experienced a pump failure without warning. That’s why I now have an alarm system in place. It’s like a guardian angel for your basement, giving you a heads-up before things get messy.
Backup Batteries
Power outages? They happen. So, I’ve invested in a backup battery for my pump. It kicks in automatically during blackouts, saving the day when I need it most.
Pump Stand
To extend my pump’s life, I’ve got it perched on a pump stand. It’s like a VIP treatment, keeping sediment and silt away from the valve. Less maintenance, more peace of mind.
Cost Of Sump Pump Installation: DIY Vs Professionals
The average cost of sump pump installation in a crawl space can typically amount to around $2,500 if you hire professionals.
Furthermore, the installation of crawl space French drains can range in cost from $4,000 to $10,000, depending on the specific requirements and complexities of the project.
On the other hand, if you do it yourself, it can cost you around $400-$800 depending on the availability of materials and the price of a sump pump that usually varies.
It’s crucial to highlight the importance of sump pump installation in flood-prone areas, especially considering the alarming statistics provided by the New York-based flood research non-profit, First Street Foundation.
Their research indicates that the combined impact of rising sea levels and extreme weather events resulted in a staggering $20 billion in flood damage to at-risk U.S. homes in 2020 alone. Moreover, projections suggest that this figure could soar to a daunting $32 billion by the year 2051 (3).
Balancing the upfront costs against potential future damages is a prudent approach when making this important decision for your home.
Wrapping Up
A sump pump installation in your crawl space is a valuable investment to protect your home from moisture issues and potential flooding.
Understanding its function, proper installation, and routine maintenance is crucial for effective operation.
Whether you opt for a DIY approach or hire professionals, a well-maintained sump pump can offer peace of mind and safeguard your property from water-related damage for years to come.
FAQs Regarding Sump Pump Installation
Q. Does a sump pump require additional drainage?
When installing a sump pump, it’s often recommended to consider additional drainage solutions.
Professionals commonly suggest pairing a sump pump with a drain tile system. This involves digging a trench around the basement’s perimeter, covering it with concrete, and placing a porous pipe and gravel within to direct water to the sump pit.
In crawl spaces without a drain tile system, the sump pump should be positioned in the lowest area where water tends to collect.
This combination of a sump pump and proper drainage helps manage water effectively, reducing the risk of flooding and moisture-related issues in the crawl space.
Q. Where is the best place to put a sump pump pit?
The optimal location for installing a sump pump pit is at the lowest point in your basement or crawl space.
This placement is based on the fundamental principle that water naturally flows downward due to gravity.
Regardless of the effectiveness of your perimeter drainage system, water will not move against gravity’s pull.
Therefore, by placing the sump pump pit at the lowest point, you ensure efficient water collection and removal from your space.
Q. What is the best location for a sump pump check valve installation?
For the most effective placement of a sump pump check valve, it’s generally installed in the vertical section of the pipe that carries water away from the pump.
Position the valve right below the point where the pipe makes a turn from going up to heading horizontally toward the drainage area.
Q. Should a sump pump be installed inside or outside?
Sump pumps are commonly installed inside homes, typically found beneath the basement or crawl space foundation.
These devices play an important role in preventing water damage by efficiently managing excess groundwater and directing it away from the home’s foundation.
Their discreet location ensures they’re out of sight while safeguarding your property from potential flooding.
Q. How deep should a sump pit be?
The recommended depth for a sump pit typically ranges between 24 to 36 inches. However, some homeowners or builders opt for a smaller size, such as a common 5-gallon bucket.
It’s important to note that using a small pit can result in rapid water accumulation, causing the sump pump to activate frequently.
This frequent cycling can potentially shorten the lifespan of both the pump and its check valve.
Q. What size sump pump should I consider for my crawl space?
For most typical-sized homes situated in areas with average water table levels, a 1/3 HP sump pump should suffice.
These pumps are generally equipped to handle vertical lifts of 7 to 10 feet from the sump pit, provided there is a single 90-degree elbow in the setup and a horizontal pipe stretch ranging from 3 to 25 feet.
Q. How far can a 1 HP sump pump push water?
A 1 HP sump pump can typically push water over longer distances and handle greater vertical lifts compared to a 0.5 HP pump, offering approximately 35 to 40% more capacity.
In practical terms, a 0.75 to 1.0 HP sump pump is well-suited for addressing situations where you need to pump water upwards from 20 to 30 feet of static head, with a discharge pipe extending approximately 150 to 250 feet in length.
John Henry is a passionate co-creator of FlooringFlow.com. a website dedicated to answer all of your flooring related questions. After taking the challenges of flooring DIYs while learning skills for years, John is now ready to share his knowledge related to floor remodeling and projects with you.
We use cookies to ensure that we give you the best experience on our website. If you continue to use this site we will assume that you are happy with it.OkPrivacy policy


 Guide")
